Introduction
In this tutorial we will learn to create Authentication System by using Laravel Passport. APIs are great and Laravel already makes it easy to perform Rest API authentication.
APIs typically use tokens to authenticate users and do not maintain session state between requests. Laravel makes API authentication a breeze using Laravel Passport, which provides a full OAuth2 server implementation for your Laravel application in a matter of minutes.
For testing of this project. We will also create a mobile app using Ionic 4. But you can also use Postman to test your APIs. We will be using a mobile app so we test the real world environment.
If you are also interested in creating mobile app of your project, see my other post Setting up Ionic to get started.
This project files are available on GitHub at https://github.com/flicher-net/laravel-auth-passport
Step 1 — Getting Started
Let’s go ahead and create a brand new Laravel Project first of all. Open your Terminal or Command Prompt and go to the directory where you want to create app. You can use following command to change directory.
cd Desktop/Then run the following command to create a new project.
composer create-project --prefer-dist laravel/laravel auth-appNext go inside the directory by running this command.
cd auth-app/Step 2 — Installing Laravel Passport
Now let’s install Laravel Passport as well by running following command.
composer require laravel/passportStep 3 — Migrate Database
The Passport service provider registers its own database migration directory with the framework, so you should migrate your database after installing the package. The Passport migrations will create the tables your application needs to store clients and access tokens.
As laravel comes with users migrations by default, which is located at database/migrations/create_users_table.php. You can also update it according to your requirement. I will just add two new columns instead of name column.
<?php

use Illuminate\Support\Facades\Schema;
use Illuminate\Database\Schema\Blueprint;
use Illuminate\Database\Migrations\Migration;

class CreateUsersTable extends Migration
{
    /**
     * Run the migrations.
     *
     * @return void
     */
    public function up()
    {
        Schema::create('users', function (Blueprint $table) {
            $table->increments('id');
            $table->string('first_name');
            $table->string('last_name');
            $table->string('email')->unique();
            $table->timestamp('email_verified_at')->nullable();
            $table->string('password');
            $table->rememberToken();
            $table->timestamps();
        });
    }

    /**
     * Reverse the migrations.
     *
     * @return void
     */
    public function down()
    {
        Schema::dropIfExists('users');
    }
}
Now we need to change database variable values in .env file. So update that file with your Database Name, Username, Password etc. So we can run our migrations.
APP_NAME=Laravel
APP_ENV=local
APP_KEY=base64:OZakMJg2LBGFcM5Da/XtArMHSEzWn7Jda+WUKW+Kwec=
APP_DEBUG=true
APP_URL=http://localhost

LOG_CHANNEL=stack

DB_CONNECTION=mysql
DB_HOST=127.0.0.1
DB_PORT=3306
DB_DATABASE=flicher
DB_USERNAME=flicheruser
DB_PASSWORD=super-secret-password

BROADCAST_DRIVER=log
CACHE_DRIVER=file
QUEUE_CONNECTION=sync
SESSION_DRIVER=file
SESSION_LIFETIME=120

REDIS_HOST=127.0.0.1
REDIS_PASSWORD=null
REDIS_PORT=6379

MAIL_DRIVER=smtp
MAIL_HOST=smtp.mailtrap.io
MAIL_PORT=2525
MAIL_USERNAME=null
MAIL_PASSWORD=null
MAIL_ENCRYPTION=null

PUSHER_APP_ID=
PUSHER_APP_KEY=
PUSHER_APP_SECRET=
PUSHER_APP_CLUSTER=mt1

MIX_PUSHER_APP_KEY="${PUSHER_APP_KEY}"
MIX_PUSHER_APP_CLUSTER="${PUSHER_APP_CLUSTER}"
After updating run the following command to migrate database.
php artisan migrateNow if you check your database, you will see all these tables.
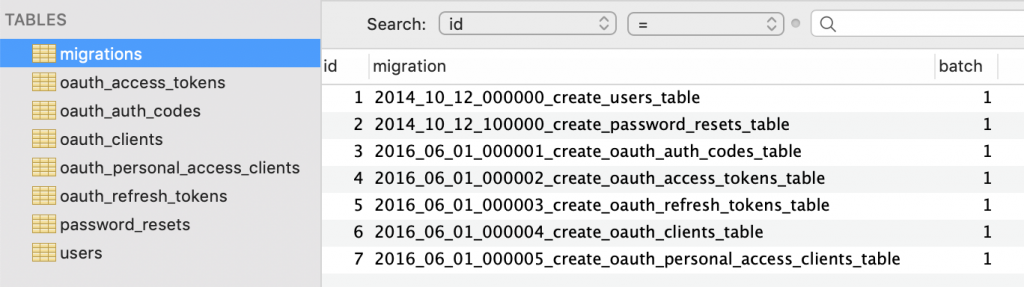
Perfect!
Step 4 — Generate Keys
Next we have to create the encryption keys needed to generate secure access tokens. In addition, the command will create “personal access” and “password grant” clients which will be used to generate access tokens. Run the following command to do that.
php artisan passport:installStep 5 — Configure
After running this command we need to do some modification in some files. So let’s do that.
First of all open App/User.php and add Laravel\Passport\HasApiTokens trait.
<?php

namespace App;

use Laravel\Passport\HasApiTokens;
use Illuminate\Notifications\Notifiable;
use Illuminate\Contracts\Auth\MustVerifyEmail;
use Illuminate\Foundation\Auth\User as Authenticatable;

class User extends Authenticatable
{
    use HasApiTokens, Notifiable;

    /**
     * The attributes that are mass assignable.
     *
     * @var array
     */
    protected $fillable = [
        'name', 'email', 'password',
    ];

    /**
     * The attributes that should be hidden for arrays.
     *
     * @var array
     */
    protected $hidden = [
        'password', 'remember_token',
    ];
}
Next open app/Providers/AuthServiceProvider.php and call Passport::routes method within the boot method. This method will register the routes necessary to issue access tokens and revoke access tokens, clients, and personal access tokens.
<?php

namespace App\Providers;

use Laravel\Passport\Passport;
use Illuminate\Support\Facades\Gate;
use Illuminate\Foundation\Support\Providers\AuthServiceProvider as ServiceProvider;

class AuthServiceProvider extends ServiceProvider
{
    /**
     * The policy mappings for the application.
     *
     * @var array
     */
    protected $policies = [
        'App\Model' => 'App\Policies\ModelPolicy',
    ];

    /**
     * Register any authentication / authorization services.
     *
     * @return void
     */
    public function boot()
    {
        $this->registerPolicies();

        Passport::routes();
    }
}
Finally, in your config/auth.php configuration file, you should set the driver option of the api authentication guard to passport. This will instruct your application to use Passport’s TokenGuard when authenticating incoming API requests.
<?php

return [

    'defaults' => [
        'guard' => 'web',
        'passwords' => 'users',
    ],

    'guards' => [
        'web' => [
            'driver' => 'session',
            'provider' => 'users',
        ],

        'api' => [
            'driver' => 'passport',
            'provider' => 'users',
        ],
    ],


    'providers' => [
        'users' => [
            'driver' => 'eloquent',
            'model' => App\User::class,
        ],

        // 'users' => [
        //     'driver' => 'database',
        //     'table' => 'users',
        // ],
    ],

    'passwords' => [
        'users' => [
            'provider' => 'users',
            'table' => 'password_resets',
            'expire' => 60,
        ],
    ],

];
Step 6 — Set API routes
Now let’s set API routes. Normally we create all our routes in routes/web.php but as we are dealing with API so we will create all our routes in routes/api.php.
Copy the following code in routes/api.php. We will create routes for login, register, logout and user.
<?php

use Illuminate\Http\Request;

Route::group([
    'prefix' => 'auth'
], function () {
    Route::post('login', 'Auth\AuthController@login')->name('login');
    Route::post('register', 'Auth\AuthController@register');
    Route::group([
      'middleware' => 'auth:api'
    ], function() {
        Route::get('logout', 'Auth\AuthController@logout');
        Route::get('user', 'Auth\AuthController@user');
    });
});
Step 7 — Create Controller
As we have already created our API routes. Now we need to create AuthController. To do that run the following command.
php artisan make:controller Auth/AuthControllerThen open app/Http/Controllers/Auth/AuthController.php and add following code.
<?php

namespace App\Http\Controllers\Auth;

use App\User;
use Carbon\Carbon;
use Illuminate\Http\Request;
use App\Http\Controllers\Controller;
use Illuminate\Support\Facades\Auth;

class AuthController extends Controller
{
    public function login(Request $request) {
        $request->validate([
            'email' => 'required|string|email',
            'password' => 'required|string',
            //'remember_me' => 'boolean'
        ]);
        $credentials = request(['email', 'password']);
        if(!Auth::attempt($credentials))
            return response()->json([
                'message' => 'Unauthorized'
            ], 401);
        $user = $request->user();
        $tokenResult = $user->createToken('Personal Access Token');
        $token = $tokenResult->token;
        if ($request->remember_me)
            $token->expires_at = Carbon::now()->addWeeks(1);
        $token->save();
        return response()->json([
            'access_token' => $tokenResult->accessToken,
            'token_type' => 'Bearer',
            'expires_at' => Carbon::parse(
                $tokenResult->token->expires_at
            )->toDateTimeString()
        ]);
    }

    public function register(Request $request)
    {
        $request->validate([
            'fName' => 'required|string',
            'lName' => 'required|string',
            'email' => 'required|string|email|unique:users',
            'password' => 'required|string'
        ]);

        $user = new User;
        $user->first_name = $request->fName;
        $user->last_name = $request->lName;
        $user->email = $request->email;
        $user->password = bcrypt($request->password);

        $user->save();

        return response()->json([
            'message' => 'Successfully created user!'
        ], 201);
    }

    public function logout(Request $request)
    {
        $request->user()->token()->revoke();
        return response()->json([
            'message' => 'Successfully logged out'
        ]);
    }

    /**
     * Get the authenticated User
     *
     * @return [json] user object
     */
    public function user(Request $request)
    {
        return response()->json($request->user());
    }
}
Step 8 — Adding CORS Middleware
Imagine that all JavaScript code for domain X running in a browser would be able to make http requests to an domain Y. Malious code on domain X would be able to interact with site Y without you knowing. In most circumstances you don’t want this. Luckily all major browsers only allow sites to make requests against their own domain. They don’t allow JavaScript code to make request against a sites on different domains. This is called the same-origin policy.
But there are some scenarios where you do want to allow that behaviour. As we need it now so let’s add CORS Middleware. Run the following command to create a new Middleware
php artisan make:middleware CorsA new file will be created, Let’s update app/Http/Middleware/Cors.php
<?php

namespace App\Http\Middleware;

use Closure;

class Cors
{
    /**
     * Handle an incoming request.
     *
     * @param  \Illuminate\Http\Request  $request
     * @param  \Closure  $next
     * @return mixed
     */
    public function handle($request, Closure $next)
    {
        return $next($request)
            ->header('Access-Control-Allow-Origin', '*')
            ->header('Access-Control-Allow-Methods', 'GET, POST, PUT, PATCH, DELETE, OPTIONS')
            ->header('Access-Control-Allow-Headers', 'Content-Type, Authorization, X-Requested-With, X-XSRF-TOKEN');
    }
}
Last step we need to register our new middleware in app/Http/Kernal.php.
<?php

namespace App\Http;

use Illuminate\Foundation\Http\Kernel as HttpKernel;

class Kernel extends HttpKernel
{
    /**
     * The application's global HTTP middleware stack.
     *
     * These middleware are run during every request to your application.
     *
     * @var array
     */
    protected $middleware = [
        \App\Http\Middleware\CheckForMaintenanceMode::class,
        \Illuminate\Foundation\Http\Middleware\ValidatePostSize::class,
        \App\Http\Middleware\TrimStrings::class,
        \Illuminate\Foundation\Http\Middleware\ConvertEmptyStringsToNull::class,
        \App\Http\Middleware\TrustProxies::class,
        \App\Http\Middleware\Cors::class,
    ];

...
Perfect now we are ready. Run the following command to run.
php artisan serveTests
As I said before I will be testing this API with a mobile app which I built using Ionic Framework. Now if you want to see how I built that app visit Ionic 4 User Registration & Login Tutorial for full tutorial.
Register
So I am gonna send POST request to http://localhost:8000/api/auth/register. I will be sending First Name, Last Name, Email and Password in POST request.
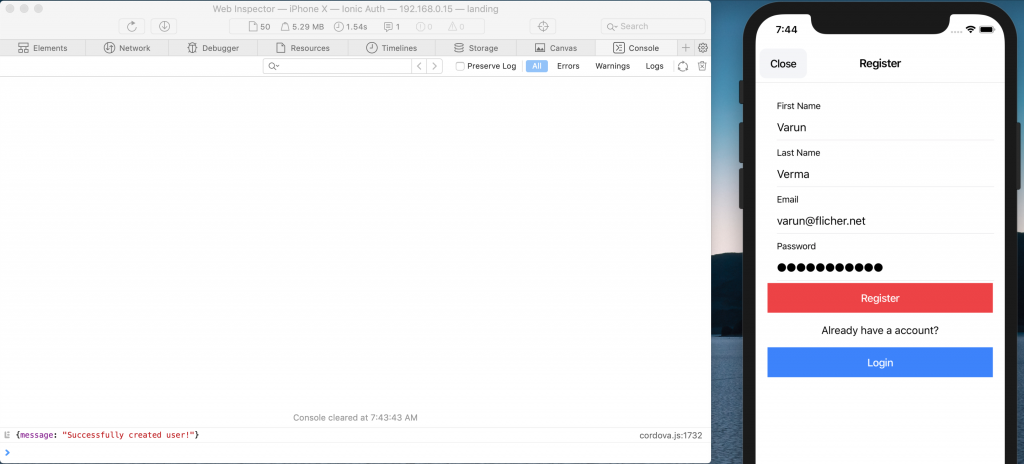
Now I when click on register button. I get message which I previously set as response, if user the is created successfully. If I check my database now I should have new user in my database.

Perfect, As user is in database now, let’s try to login.
Login
For login we need to send POST request to http://localhost:8000/api/auth/login and we need to send email and password in request so we can get a Bearer Token as response.
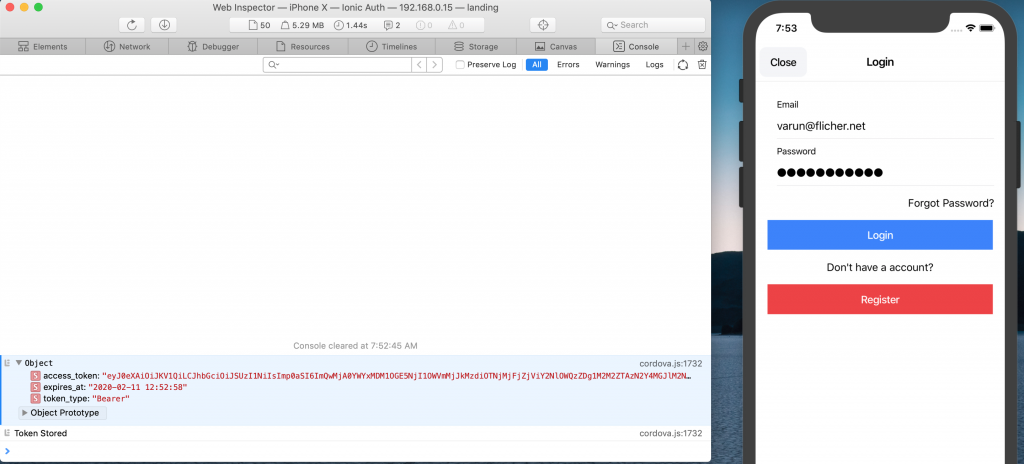
As you can see when I tried to login I did got token. I can store this token in local storage of phone or web browser. We will be using this token to get all user data which is protected by API Auth Middleware.
Now this token is also stored in oauth_access_tokens table.

Perfect! Let’s try to get user details now as we are logged in now and we have token.
User
We will be sending GET request to http://localhost/api/auth/user and we need to send token as Authorization Header.
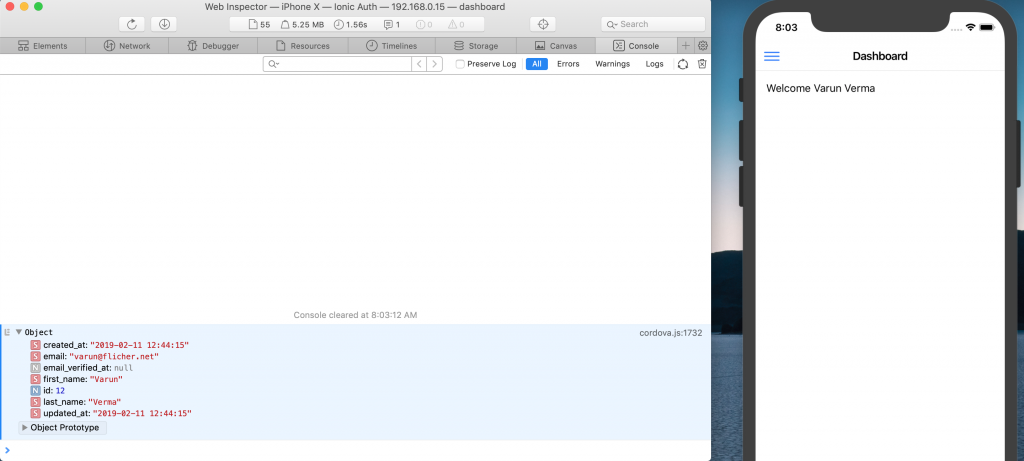
As you can see when I send GET request to http://localhost/api/auth/user with Authorization Header as token which I got earlier. I am getting user details from database.
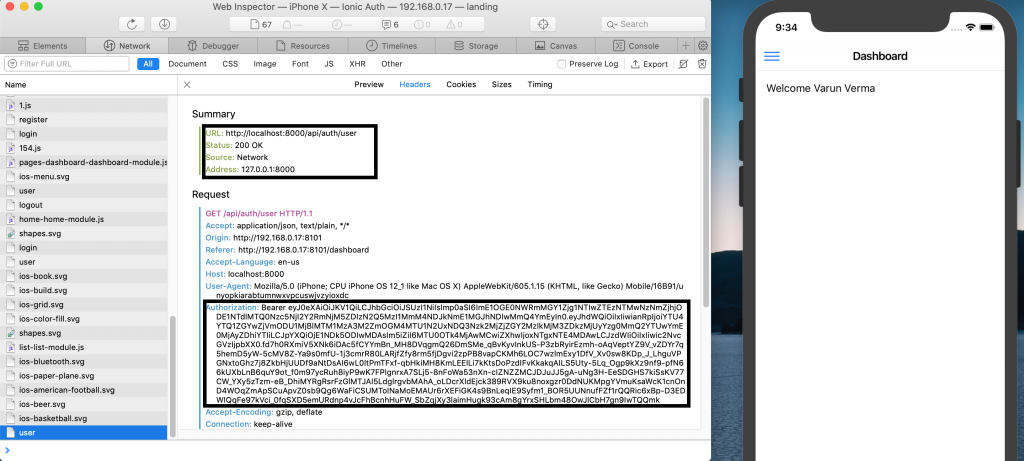
As you can see under network, we have included token as header.
Logout
Last thing but not least. Let’s try to test logout as well. So I will click on logout button from menu, which will send GET request to http://localhost/api/auth/logout and I also need to send send token as Authorization Header again.
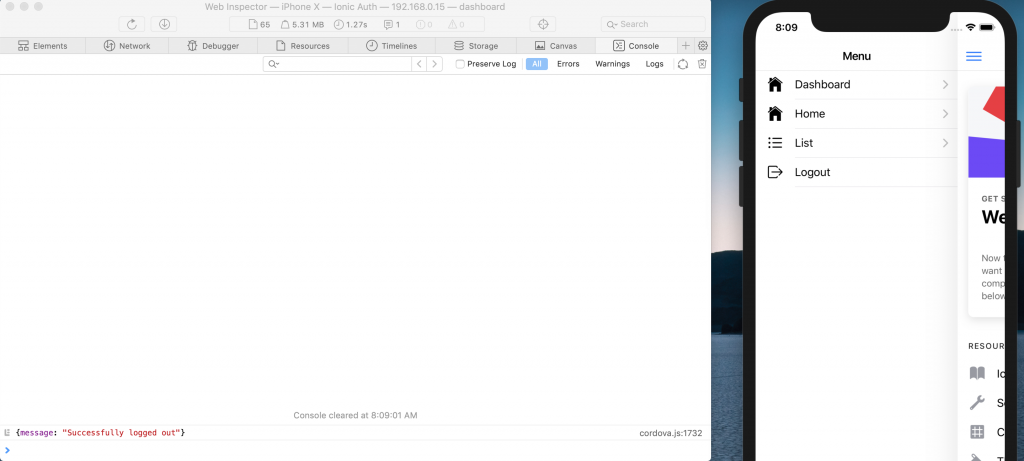
Perfect! We get response back from back-end.
Conclusion
Congratulation! You have successfully added API Authentication in your Laravel Application. If you have any questions ping me Twitter on leave a comment below.
Resources
Laravel Framework Passport docs
Ionic Framework docs
Setting up Ionic Tutorial
Ionic 4 User Registration & Login Tutorial


