
INTRODUCTION
In this tutorial, we will build simple Login and Registration system using Ionic 4 Framework. I hope that you already know the basics of Ionic. We will use CLI, Angular Router, Guards, Services etc. This app is going to send and receive data from backend. We will implement HTTP API calls in this app.
PREREQUISITES
First of all we will start with installing Node and Ionic if you don’t have already installed. Follow Setting up Ionic 4 Tutorial or visit Ionic Framework docs for more info.
This project is available on GitHub at https://github.com/flicher-net/ionic-4-auth
Ionic CLI version is available at https://github.com/flicher-net/ionic-4-auth-cli
STEP 1 — GETTING STARTED
After making sure you have the latest version on Ionic and Cordova installed, let’s go and create an app now and integrate authentication in it.
To get started let’s create a new app first. Open your Terminal or Command Prompt and got to the directory where you want to create app. You can use following command to change directory.
cd Desktop/Then run the following command to create a new app.
ionic start appName sidemenu --type=angularAfter installing `NPM` modules and dependencies, you will see this question, just type `N` because we are not using it yet.
Install the free Ionic Appflow SDK and connect your app? (Y/n) : NNext, go to the newly created app folder.
cd appName/Now we have successfully created an Ionic 4 app, Now let’s integrate authentication in it. Let’s run few commands to create few pages, services etc. Don’t we will add code to these pages and services later so just run commands for now.
ionic generate page pages/landing
ionic generate page pages/auth/login
ionic generate page pages/auth/register
ionic generate page pages/dashboard
ionic generate service services/auth
ionic generate service services/alert
ionic generate service services/env
ionic generate guard guard/auth
We also need Native Storage plugin to store auth token which we will using in HTTP calls. Run the following command to install it.
ionic cordova plugin add cordova-plugin-nativestorage
npm install @ionic-native/native-storage
Step 2 — Update app/app.module.ts
As we added Native storage plugin into our app, we also need to add it to our src/app/app.module.ts. We also need to add HttpClientModule as we are going to send request to Rest API to get token, user data etc.
Now go to src/app/app.module.ts and add following code. Don’t forget the comma (,) in the end of line 21 and 27.
import { NgModule } from '@angular/core';
import { BrowserModule } from '@angular/platform-browser';
import { RouteReuseStrategy } from '@angular/router';

import { IonicModule, IonicRouteStrategy } from '@ionic/angular';
import { SplashScreen } from '@ionic-native/splash-screen/ngx';
import { StatusBar } from '@ionic-native/status-bar/ngx';

import { AppComponent } from './app.component';
import { AppRoutingModule } from './app-routing.module';
import { HttpClientModule }    from '@angular/common/http';
import { NativeStorage } from '@ionic-native/native-storage/ngx';

@NgModule({
  declarations: [AppComponent],
  entryComponents: [],
  imports: [
    BrowserModule,
    IonicModule.forRoot(),
    AppRoutingModule,
    HttpClientModule,
  ],
  providers: [
    StatusBar,
    SplashScreen,
    { provide: RouteReuseStrategy, useClass: IonicRouteStrategy },
    NativeStorage
  ],
  bootstrap: [AppComponent]
})
export class AppModule {}
Step 3 — Create User Model
Let’s create the user model. We need to add user interface into it. To do that create a new folder under src/app folder name it models and create a new file into models folder and name it as user.ts. Copy the following code into user.ts file.
export class User {
    id: number;
    first_name: string;
    last_name: string;
    email: string;
}
Step 4 — Updating Services
In this app we will be using 3 services. We have already generated them in the beginning. It’s always good to create services, where we can put our code which we will be using a lot. Now let’s go ahead and edit them.
Env Service
In this service we will put our Environment Variables. For example: API_URL. Go to src/app/services/env.service.ts, and add variable API_URL and add your Api URl.
import { Injectable } from '@angular/core';

@Injectable({
  providedIn: 'root'
})
export class EnvService {
  API_URL = '';

  constructor() { }
}
Alert Service
In this service we will use Angular Toast Notification to give alert message to user. Go to src/app/services/alert.service.ts and add following code.
import { Injectable } from '@angular/core';
import { ToastController } from '@ionic/angular';

@Injectable({
  providedIn: 'root'
})
export class AlertService {

  constructor(private toastController: ToastController) { }

  async presentToast(message: any) {
    const toast = await this.toastController.create({
      message: message,
      duration: 2000,
      position: 'top',
      color: 'dark'
    });
    toast.present();
  }
}
Auth Service
This service will handle login, registration, logout and getting user info. Now go ahead and add following code into src/app/services/auth.service.ts.
import { HttpClient, HttpHeaders } from '@angular/common/http';
import { Injectable } from '@angular/core';
import { tap } from 'rxjs/operators';
import { NativeStorage } from '@ionic-native/native-storage/ngx';
import { EnvService } from './env.service';
import { User } from '../models/user';

@Injectable({
  providedIn: 'root'
})

export class AuthService {
  isLoggedIn = false;
  token:any;

  constructor(
    private http: HttpClient,
    private storage: NativeStorage,
    private env: EnvService,
  ) { }

  login(email: String, password: String) {
    return this.http.post(this.env.API_URL + 'auth/login',
      {email: email, password: password}
    ).pipe(
      tap(token => {
        this.storage.setItem('token', token)
        .then(
          () => {
            console.log('Token Stored');
          },
          error => console.error('Error storing item', error)
        );
        this.token = token;
        this.isLoggedIn = true;
        return token;
      }),
    );
  }

  register(fName: String, lName: String, email: String, password: String) {
    return this.http.post(this.env.API_URL + 'auth/register',
      {fName: fName, lName: lName, email: email, password: password}
    )
  }

  logout() {
    const headers = new HttpHeaders({
      'Authorization': this.token["token_type"]+" "+this.token["access_token"]
    });

    return this.http.get(this.env.API_URL + 'auth/logout', { headers: headers })
    .pipe(
      tap(data => {
        this.storage.remove("token");
        this.isLoggedIn = false;
        delete this.token;
        return data;
      })
    )
  }

  user() {
    const headers = new HttpHeaders({
      'Authorization': this.token["token_type"]+" "+this.token["access_token"]
    });

    return this.http.get<User>(this.env.API_URL + 'auth/user', { headers: headers })
    .pipe(
      tap(user => {
        return user;
      })
    )
  }

  getToken() {
    return this.storage.getItem('token').then(
      data => {
        this.token = data;

        if(this.token != null) {
          this.isLoggedIn=true;
        } else {
          this.isLoggedIn=false;
        }
      },
      error => {
        this.token = null;
        this.isLoggedIn=false;
      }
    );
  }
}
As you can see we are Using Angular HTTP Module to make API calls. You will see URL for login is API_URL + ‘auth/login’ and register is API_URL + ‘auth/register’. You can edit this according to your API URL.
Step 5 — Add Auth Guard
So when our app loads, it will check for auth token. If token exists, which means user is logged in and app will let user go to dashboard, Otherwise if token doesn’t exists, app will take user to landing page which will prompt user to login or register.
To do this we will Guard, Update following code in src/app/guard/auth.guard.ts file.
import { Injectable } from '@angular/core';
import { CanActivate, ActivatedRouteSnapshot, RouterStateSnapshot, Router } from '@angular/router';
import { Observable } from 'rxjs';
import { AuthService } from '../services/auth.service';

@Injectable({
  providedIn: 'root'
})
export class AuthGuard implements CanActivate {
  constructor(
    private router: Router,
    private authService: AuthService
  ) {}
  canActivate(
    next: ActivatedRouteSnapshot,
    state: RouterStateSnapshot): Observable<boolean> | Promise<boolean> | boolean {
      const currentUser = this.authService.isLoggedIn;
      if (currentUser) {
          // authorised so return true
          return true;
      }

      // not logged in so redirect to login page with the return url
      this.router.navigate(['/landing']);
      return false;
  }
}
Step 6 — Update Pages
As we have already generated some pages in the beginning like Login, Register, Landing, Dashboard. Now let’s go ahead and edit them.
You will see src/app/home and src/app/list folder, you can go ahead and delete them if you don’t need them. In this tutorial we will just leave them and we will treat them as auth pages, they will be only accessible if user is authenticated.
We will be disabling side menu in Landing, Login and Register Page as well.
Login Page
Let’s add a form into login page which will ask for Email and Password. It will look like this. As we will open login page in a modal from landing page so we will also add close button on top left to close modal.
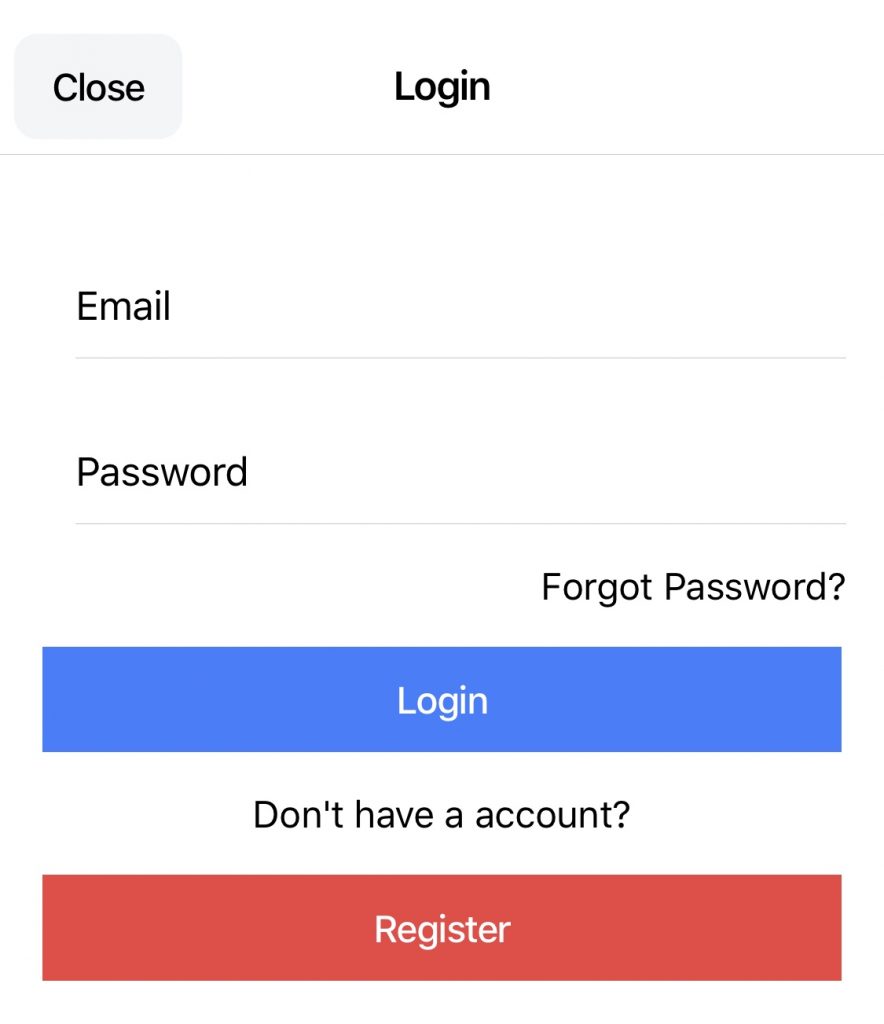
Now go ahead to src/app/pages/auth/login.html and add following code.
<ion-header>
  <ion-toolbar>
    <ion-button color="light" (click)="dismissLogin()">Close</ion-button>
    <ion-title>Login</ion-title>
  </ion-toolbar>
</ion-header>

<ion-content padding>
  <form #form="ngForm" (ngSubmit)="login(form)" method="post">
    <ion-item>
      <ion-label position="floating">Email</ion-label>
      <ion-input ngModel type="email" name="email"></ion-input>
    </ion-item>

    <ion-item>
      <ion-label position="floating">Password</ion-label>
      <ion-input ngModel type="password" name="password"></ion-input>
    </ion-item>

    <p text-right>Forgot Password?</p>

    <ion-button type="submit" expand="full" color="primary">Login</ion-button>
  </form>

  <p text-center>Don't have a account?</p>
  <ion-button expand="full" color="danger" (click)="registerModal()">Register</ion-button>
</ion-content>
We also need to edit src/app/pages/auth/login.page.ts, so go ahead and add the following code.
import { Component, OnInit } from '@angular/core';
import { ModalController, NavController } from '@ionic/angular';
import { RegisterPage } from '../register/register.page';
import { NgForm } from '@angular/forms';
import { AuthService } from 'src/app/services/auth.service';
import { AlertService } from 'src/app/services/alert.service';

@Component({
  selector: 'app-login',
  templateUrl: './login.page.html',
  styleUrls: ['./login.page.scss'],
})
export class LoginPage implements OnInit {

  constructor(
    private modalController: ModalController,
    private authService: AuthService,
    private navCtrl: NavController,
    private alertService: AlertService
  ) { }

  ngOnInit() {
  }

  // Dismiss Login Modal
  dismissLogin() {
    this.modalController.dismiss();
  }

  // On Register button tap, dismiss login modal and open register modal
  async registerModal() {
    this.dismissLogin();
    const registerModal = await this.modalController.create({
      component: RegisterPage
    });
    return await registerModal.present();
  }

  login(form: NgForm) {
    this.authService.login(form.value.email, form.value.password).subscribe(
      data => {
        this.alertService.presentToast("Logged In");
      },
      error => {
        console.log(error);
      },
      () => {
        this.dismissLogin();
        this.navCtrl.navigateRoot('/dashboard');
      }
    );
  }
}
Register Page
We will be doing the same with Register Page as well which will look like this.
Let’s change src/app/pages/auth/register.page.html file.
<ion-header>
  <ion-toolbar>
    <ion-button color="light" (click)="dismissRegister()">Close</ion-button>
    <ion-title>Register</ion-title>
  </ion-toolbar>
</ion-header>

<ion-content padding>

  <form #form="ngForm" (ngSubmit)="register(form)" method="post">
    <ion-item>
        <ion-label position="floating">First Name</ion-label>
        <ion-input ngModel name="fName"></ion-input>
    </ion-item>

    <ion-item>
      <ion-label position="floating">Last Name</ion-label>
      <ion-input ngModel name="lName"></ion-input>
    </ion-item>

    <ion-item>
      <ion-label position="floating">Email</ion-label>
      <ion-input type="email" ngModel name="email"></ion-input>
    </ion-item>

    <ion-item>
      <ion-label position="floating">Password</ion-label>
      <ion-input type="password" ngModel name="password"></ion-input>
    </ion-item>

    <ion-button type="submit" expand="full" color="danger">Register</ion-button>
  </form>

  <p text-center>Already have a account?</p>
  <ion-button expand="full" color="primary" (click)="loginModal()">Login</ion-button>
</ion-content>
And add following code to src/app/pages/auth/register.page.ts.
import { Component, OnInit } from '@angular/core';
import { ModalController, NavController } from '@ionic/angular';
import { LoginPage } from '../login/login.page';
import { AuthService } from 'src/app/services/auth.service';
import { NgForm } from '@angular/forms';
import { AlertService } from 'src/app/services/alert.service';

@Component({
  selector: 'app-register',
  templateUrl: './register.page.html',
  styleUrls: ['./register.page.scss'],
})
export class RegisterPage implements OnInit {

  constructor(private modalController: ModalController,
    private authService: AuthService,
    private navCtrl: NavController,
    private alertService: AlertService
  ) { }

  ngOnInit() {
  }

  // Dismiss Register Modal
  dismissRegister() {
    this.modalController.dismiss();
  }

  // On Login button tap, dismiss Register modal and open login Modal
  async loginModal() {
    this.dismissRegister();
    const loginModal = await this.modalController.create({
      component: LoginPage,
    });
    return await loginModal.present();
  }

  register(form: NgForm) {
    this.authService.register(form.value.fName, form.value.lName, form.value.email, form.value.password).subscribe(
      data => {
        this.authService.login(form.value.email, form.value.password).subscribe(
          data => {
          },
          error => {
            console.log(error);
          },
          () => {
            this.dismissRegister();
            this.navCtrl.navigateRoot('/dashboard');
          }
        );
        this.alertService.presentToast(data['message']);
      },
      error => {
        console.log(error);
      },
      () => {

      }
    );
  }
}
Landing Page
This will be the starting page of our app, we will change it to starting page later in tutorial. Our landing page will look like this.
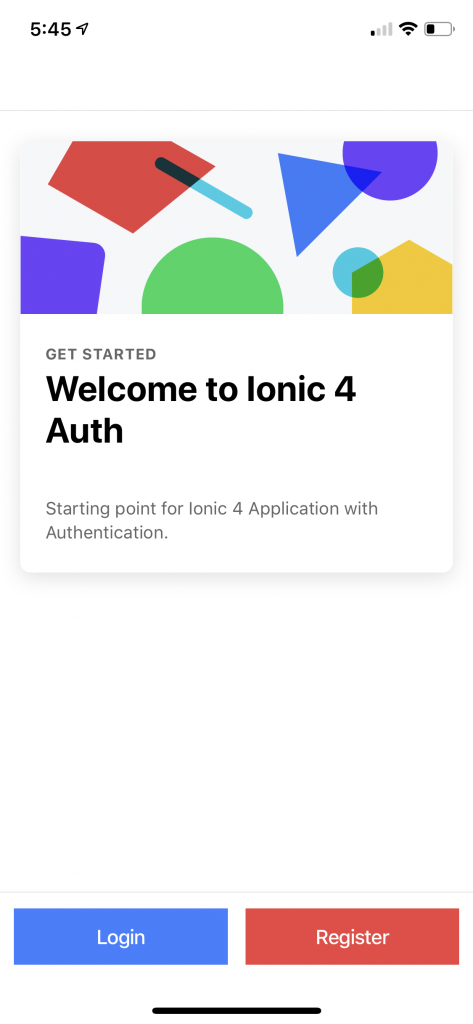
And add following code to src/app/pages/landing.page.html.
<ion-header>
  <ion-toolbar>
    <!-- <ion-title>landing</ion-title> -->
  </ion-toolbar>
</ion-header>

<ion-content>
  <ion-card class="welcome-card">
    <ion-img src="/assets/shapes.svg"></ion-img>
    <ion-card-header>
      <ion-card-subtitle>Get Started</ion-card-subtitle>
      <ion-card-title>Welcome to Ionic 4 Auth</ion-card-title>
    </ion-card-header>
    <ion-card-content>
      <p>Starting point for Ionic 4 Application with Authentication.</p>
    </ion-card-content>
  </ion-card>
</ion-content>

<ion-footer>
  <ion-toolbar>
      <ion-row>
        <ion-col>
          <ion-button color="primary" expand="full" color="primary" (click)="login()">Login</ion-button>
        </ion-col>
        <ion-col>
          <ion-button color="primary" expand="full" color="danger" (click)="register()">Register</ion-button>
        </ion-col>
      </ion-row>
  </ion-toolbar>
</ion-footer>
Also add following code to src/app/pages/landing.page.ts.
import { Component, OnInit } from '@angular/core';
import { ModalController, MenuController, NavController } from '@ionic/angular';
import { RegisterPage } from '../auth/register/register.page';
import { LoginPage } from '../auth/login/login.page';
import { AuthService } from 'src/app/services/auth.service';

@Component({
  selector: 'app-landing',
  templateUrl: './landing.page.html',
  styleUrls: ['./landing.page.scss'],
})
export class LandingPage implements OnInit {

  constructor(
    private modalController: ModalController,
    private menu: MenuController,
    private authService: AuthService,
    private navCtrl: NavController,
  ) {
    this.menu.enable(false);
  }

  ionViewWillEnter() {
    this.authService.getToken().then(() => {
      if(this.authService.isLoggedIn) {
        this.navCtrl.navigateRoot('/dashboard');
      }
    });
  }

  ngOnInit() {

  }

  async register() {
    const registerModal = await this.modalController.create({
      component: RegisterPage
    });
    return await registerModal.present();
  }

  async login() {
    const loginModal = await this.modalController.create({
      component: LoginPage,
    });
    return await loginModal.present();
  }
}
As we are going to be loading modal from landing page of Login page and Register Page. We need to declare Login and Register page and set entry point in our module. Now we can take advantage of Ionic 4 Lazy Loading. Open src/app/pages/landing/landing.module.ts file and add following line.
import { NgModule } from '@angular/core';
import { CommonModule } from '@angular/common';
import { FormsModule } from '@angular/forms';
import { Routes, RouterModule } from '@angular/router';

import { IonicModule } from '@ionic/angular';

import { LandingPage } from './landing.page';
import { LoginPage } from '../auth/login/login.page';
import { RegisterPage } from '../auth/register/register.page';

const routes: Routes = [
  {
    path: '',
    component: LandingPage
  }
];

@NgModule({
  imports: [
    CommonModule,
    FormsModule,
    IonicModule,
    RouterModule.forChild(routes)
  ],
  declarations: [LandingPage, LoginPage, RegisterPage],
  entryComponents: [LoginPage, RegisterPage]
})
export class LandingPageModule {}
Dashboard Page
Let’s add basic functionality in this page so when this page will load it will display user First name.
Open src/app/pages/dashboard/dashboard.page.html and add following code.
<ion-header>
  <ion-toolbar>
    <ion-buttons slot="start">
      <ion-menu-button></ion-menu-button>
    </ion-buttons>
    <ion-title>Dashboard</ion-title>
  </ion-toolbar>
</ion-header>

<ion-content padding>
  <div *ngIf="user != undefined">
      Welcome {{ user["first_name"]  }} {{ user["last_name"]  }}
  </div>
</ion-content>
Also add following code into src/app/dashboard/dashboard.page.ts.
import { Component, OnInit } from '@angular/core';
import { MenuController } from '@ionic/angular';
import { AuthService } from 'src/app/services/auth.service';
import { User } from 'src/app/models/user';

@Component({
  selector: 'app-dashboard',
  templateUrl: './dashboard.page.html',
  styleUrls: ['./dashboard.page.scss'],
})
export class DashboardPage implements OnInit {

  user: User;

  constructor(private menu: MenuController, private authService: AuthService) {
    this.menu.enable(true);
  }

  ngOnInit() {

  }

  ionViewWillEnter() {
    this.authService.user().subscribe(
      user => {
        this.user = user;
      }
    );
  }
}
Step 7 — Update Routing
As Ionic 4 uses Angular routing, so let’s go ahead and edit src/app/app-routing.module.ts. We also need to add Auth Guard which we created earlier to some pages like dashboard, home, list.
We also need to change the starting page of app when it loads. To do that change src/app/app-routing.module.ts file.
import { NgModule } from '@angular/core';
import { Routes, RouterModule } from '@angular/router';
import { AuthGuard } from './guard/auth.guard';

const routes: Routes = [
  {
    path: '',
    redirectTo: 'landing',
    pathMatch: 'full'
  },
  { path: 'landing', loadChildren: './pages/landing/landing.module#LandingPageModule' },
  { path: 'login', loadChildren: './pages/auth/login/login.module#LoginPageModule' },
  { path: 'register', loadChildren: './pages/auth/register/register.module#RegisterPageModule' },

  { path: 'dashboard', loadChildren: './pages/dashboard/dashboard.module#DashboardPageModule', canActivate: [AuthGuard] },
  { path: 'home', loadChildren: './home/home.module#HomePageModule', canActivate: [AuthGuard] },
  { path: 'list', loadChildren: './list/list.module#ListPageModule', canActivate: [AuthGuard] },
];

@NgModule({
  imports: [RouterModule.forRoot(routes)],
  exports: [RouterModule]
})
export class AppRoutingModule {}
Step 8 — Updating App Component
By default App Component is loaded which do pre checks before launching the app. In the constructor of our App Component, we can do any work that needs to happen on initialization of the app. By default, there are some calls to Cordova Plugins through Ionic Native etc.
Remember we said we will check that each time our app loads we will check if user is authenticated or not, we can do it here in app component. So open src/src/app/app.component.ts and add following code
import { Component } from '@angular/core';
import { Platform, NavController } from '@ionic/angular';
import { SplashScreen } from '@ionic-native/splash-screen/ngx';
import { StatusBar } from '@ionic-native/status-bar/ngx';
import { AuthService } from './services/auth.service';
import { AlertService } from './services/alert.service';

@Component({
  selector: 'app-root',
  templateUrl: 'app.component.html'
})
export class AppComponent {
  public appPages = [
    {
      title: 'Dashboard',
      url: '/dashboard',
      icon: 'home'
    },
    {
      title: 'Home',
      url: '/home',
      icon: 'home'
    },
    {
      title: 'List',
      url: '/list',
      icon: 'list'
    },
  ];

  constructor(
    private platform: Platform,
    private splashScreen: SplashScreen,
    private statusBar: StatusBar,
    private authService: AuthService,
    private navCtrl: NavController,
    private alertService: AlertService
  ) {
    this.initializeApp();
  }

  initializeApp() {
    this.platform.ready().then(() => {
      this.statusBar.styleDefault();
      // Commenting splashScreen Hide, so it won't hide splashScreen before auth check
      //this.splashScreen.hide();
      this.authService.getToken();
    });
  }

  // When Logout Button is pressed
  logout() {
    this.authService.logout().subscribe(
      data => {
        this.alertService.presentToast(data['message']);
      },
      error => {
        console.log(error);
      },
      () => {
        this.navCtrl.navigateRoot('/landing');
      }
    );
  }
}
Let’s also add Logout button in menu which will look like this.
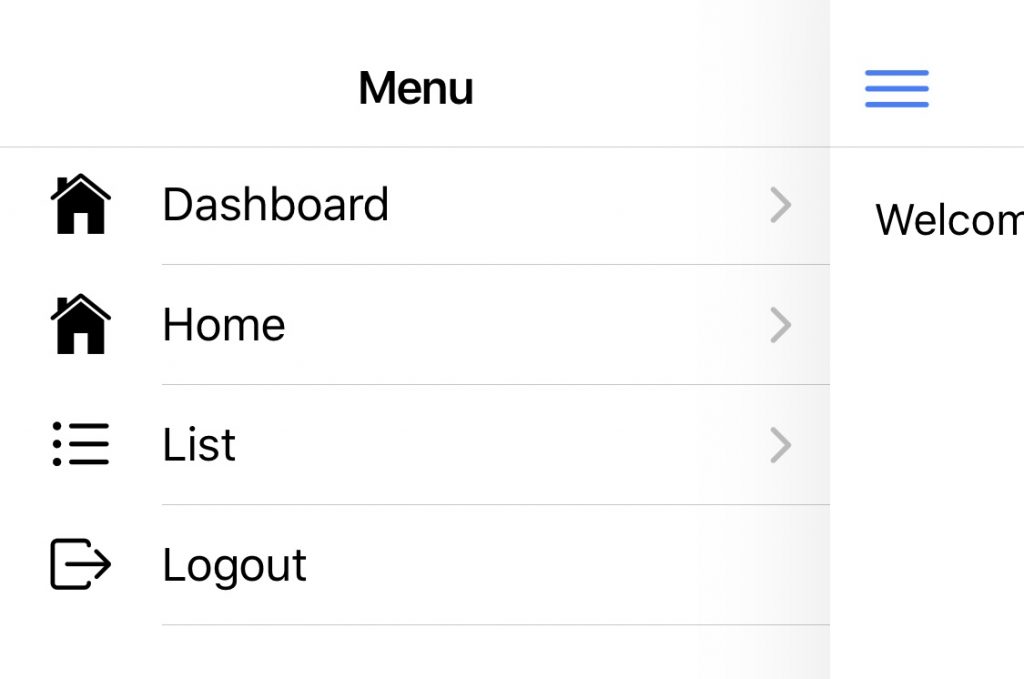
Open src/app/app.component.html and add following code to file.
<ion-app>
  <ion-split-pane>
    <ion-menu>
      <ion-header>
        <ion-toolbar>
          <ion-title>Menu</ion-title>
        </ion-toolbar>
      </ion-header>
      <ion-content>
        <ion-list>
          <ion-menu-toggle auto-hide="false" *ngFor="let p of appPages">
            <ion-item [routerDirection]="'root'" [routerLink]="[p.url]">
              <ion-icon slot="start" [name]="p.icon"></ion-icon>
              <ion-label>
                {{p.title}}
              </ion-label>
            </ion-item>
          </ion-menu-toggle>
          <ion-item (click)="logout()">
            <ion-icon slot="start" name="log-out"></ion-icon>
            <ion-label>
              Logout
            </ion-label>
          </ion-item>
        </ion-list>
      </ion-content>
    </ion-menu>
    <ion-router-outlet main></ion-router-outlet>
  </ion-split-pane>
</ion-app>
Step 9 — Running the app
Perfect you have successfully added authentication into you app. I hope your Backend Server is ready as well. So we can run the app now. Now as we are using Ionic Native plugins like Native Storage, we need to run this app on device or emulator. The easiest way to run our app on phone using Ionic Dev App. Run the following command in terminal and open Ionic Dev app on your phone.
ionic serve -cYour app will appear automatically in Ionic Dev App, after terminal finished compiling app. If not try to connect to app manually by entering address and port.
Conclusion
With the help of Ionic 4 CLI, we were able to generate pages, guards and services quickly and we were able to integrate authentication successfully in our app.
If you also want to see how to setup backend. Please check Laravel Rest API Passport Authentication for Ionic App
If you have any questions, Ping me on Twitter or let me know on comments below.


